Thursday, March 10, 2011

Starting Weblogic servers(SOA & OSB), JDeveloper and OEPE on Windows 7

In recent past I have seen many queries on OTN related to access issues on Windows 7 while starting Weblogic 11g servers , so thought to blog about the same. In this post I will demonstrate that how you should start weblogic servers, JDeveloper and OEPE on Windows 7


First of all let me describe that why an access issue comes on windows 7. In Windows 7, by default only limited set of programs are executed as an “Administrator” even if you are logged in as an Admin user. To start a normal program as Admin, you have to do it explicitly. Microsoft has already released a note on the same here.

So let’s see how we can start Weblogic (SOA & OSB) servers on windows 7 with Admin access.

1. Starting Weblogic AdminServer

a) To start Admin server, go to Start --> All Programs --> Oracle Weblogic --> User Projects -->  DomainName

b) Right click on “Start Server for .. Domain” shortcut and select “Run As Administrator” option


c) If prompted by UAC (User Account Control), then click on Yes to apply permission to allow the program to run with full permission as an administrator.


NOTE: If you are doing this, while logged in as standard user instead of an administrator, then you will need to provide the administrator's password before the program will run as administrator.

d) Once the AdminServer gets started, you may go ahead and start Managed Servers


2. Starting Weblogic Managed Servers

a) To start a managed server, first of all you need to open a command prompt and this is the tricky part. For opening a command prompt, go to Start and type “cmd” in “Search programs and files” section. This will show you “cmd.exe” under “Programs” section. Right click on “cmd.exe” and select “Run as administrator” option-


b) If prompted by UAC (User Account Control), then click on Yes to apply permission to allow the program to run with full permission as an administrator.


NOTE: If you are doing this, while logged in as standard user instead of an administrator, then you will need to provide the administrator's password before the program will run as administrator.

c) Now as usual, navigate to $Domain_Home/bin directory and execute startManagedWeblogic.cmd with server name as argument to start the managed server.

3. Starting JDeveloper

To start JDeveloper, go to $JDev_Home (generally $mw_home\jdeveloper), right click on “jdeveloper.exe” and select “Run as administrator” option

4. Starting OEPE

To start OEPE, go to $OEPE_HOME (generally $mw_home\oepe_11gR1PS2 for PS2 release), right click on “eclipse.exe” and select “Run as administrator” option

If you still face an issue, raise a thread in OTN SOA Suite forum with details. Enjoy SOA suite 11g on Windows 7.

Thursday, February 24, 2011

Correlation in Oracle B2B 11g

In Oracle B2B 10g, it was not possible to correlate all the type of documents. Correlation was possible only for B2B protocols which support correlation as part of their specification/implementation like RosettaNet (through PIP) and ebMS (through "Conversation_ID"). For rest of the document types, we have to rely on middleware to have content-based correlation.

Now, Oracle B2B 11g has come up with an out-of-box support for correlation for all the type of xml-based documents. By just specifying X-Path in "Correlation" tab of Document Definition, all the XML-based documents can now be correlated. In "Correlation" tab there are four fields -


1. Correlation From Xpath Name
2. Correlation From Xpath Expression
3. Correlation To Xpath Name
4. Correlation To Xpath Expression
 
"Correlation From" fields should be set for the document definitions which start a collaboration (e.g. Purchase Order Request). "Correlation To" fields should be set for the document definitions which participate in a collaboration and gets correlated with a document definition which started that particular collaboration (e.g. Purchase Order Response)


At runtime, when a document passes from Oracle B2B which starts a collaboration, Oracle B2B will extract the value of correlation property/content of message by using Xpath expression provided in "Correlation From Xpath Expression" and store it with business message details of that message. When a document arrives at Oracle B2B, which participates in a collaboration, then Oracle B2B extracts the value of correlation property/content of message by using Xpath expression provided in "Correlation To Xpath Expression" and compares it with already existing correlation property/content of message of those messages which have already started a collaboration. When a match found, correlation happens. If no match found, then a new collaboration gets created.

Let's understand in depth that how correlation should be implemented in Oracle B2B 11g for any XML-based document, by an example.

In this example, I will use "Custom" XML document type. I am assuming that OracleServices is my host trading partner and MarketInc is a remote trading partner. Now flow will be like this -


1. OracleServices will send a PurchaseOrderRequest PO to MarketInc
2. MarketInc will send a PurchaseOrderResponse PO back to the OracleServices
3. Request and Response messages will be correlated on the basis of PO ID which is a required field in both request and response PO XSD's


I am using below XSD's for PurchaseOrderRequest and PurchaseOrderResponse respectively-


<?xml version= '1.0' encoding= 'UTF-8' ?>
<schema xmlns="http://www.w3.org/2001/XMLSchema" targetNamespace="http://xmlns.oracle.com/ns/order"
xmlns:po="http://xmlns.oracle.com/ns/order" elementFormDefault="qualified">
<element name="PurchaseOrderRequest" type="po:PurchaseOrderRequestType"/>
<complexType name="PurchaseOrderRequestType">
<sequence>
<element name="CustID" type="string"/>
<element name="ID" type="string"/>
<element name="productName" type="string" minOccurs="0"/>
<element name="itemType" type="string" minOccurs="0"/>
<element name="price" type="decimal" minOccurs="0"/>
<element name="quantity" type="decimal" minOccurs="0"/>
<element name="status" type="string" minOccurs="0"/>
<element name="ccType" type="string" minOccurs="0"/>
<element name="ccNumber" type="string" minOccurs="0"/>
</sequence>
</complexType>
</schema>


<?xml version= '1.0' encoding= 'UTF-8' ?>
<schema xmlns="http://www.w3.org/2001/XMLSchema" targetNamespace="http://xmlns.oracle.com/ns/order"
xmlns:po="http://xmlns.oracle.com/ns/order" elementFormDefault="qualified">
<element name="PurchaseOrderResponse" type="po:PurchaseOrderResponseType"/>
<complexType name="PurchaseOrderResponseType">
<sequence>
<element name="ID" type="string"/>
<element name="status" type="string" minOccurs="0"/>
</sequence>
</complexType>
</schema>


As you can see, both the XSD's have an element, named "ID" which would actually hold the PO ID and will be unique for each and every PO.

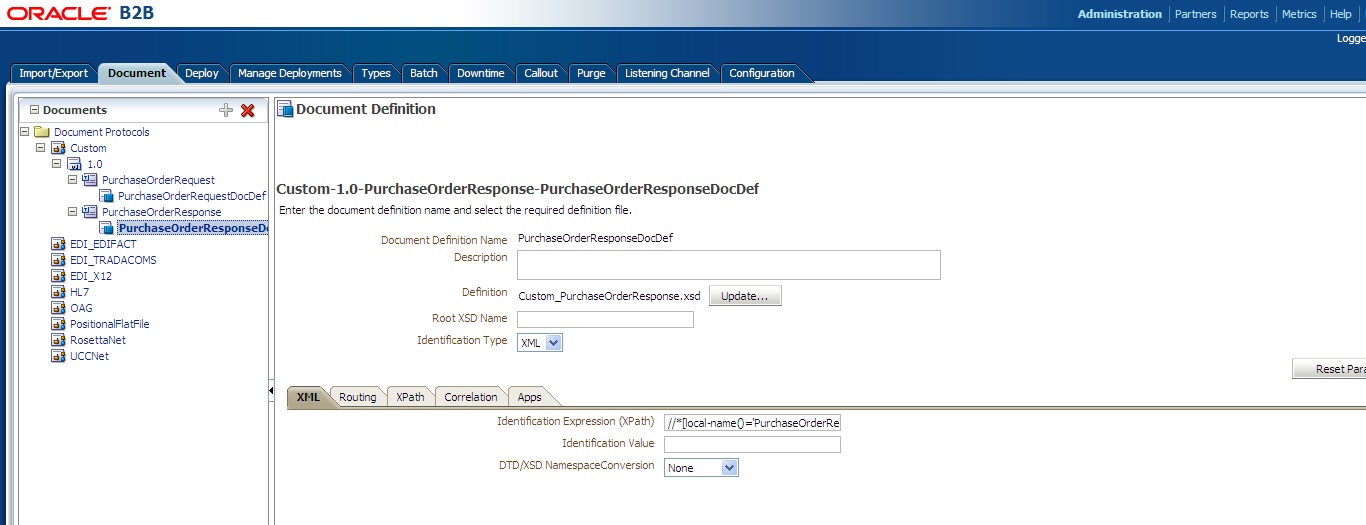
Now login to your B2B console and go to "Administration --> Document" section and create new version "1.0" under Custom document. Also create the Document Types PurchaseOrderRequest and PurchaseOrderResponse and under them Document Defintions PurchaseOrderRequestDocDef and PurchaseOrderResponseDocDef respectively as shown below -


Following are the "Identification Expression (Xpath)" setting for PurchaseOrderRequestDocDef & PurchaseOrderResponseDocDef respectively -


//*[local-name()='PurchaseOrderRequest']
//*[local-name()='PurchaseOrderResponse']


As always a PurchaseOrderResponse PO would need to be correlated with PurchaseOrderRequest (and NOT the vice-versa because a PurchaseOrderRequest will always have a unique PO ID), hence PurchaseOrderRequest PO is starting the collaboration and PurchaseOrderResponse PO will participate in a collaboration on the basis of it's correlation with a PurchaseOrderRequest.

Now go to "Correlation" tab of PurchaseOrderRequestDocDef and provide value "POID" in "Correlation From XPath Name" setting & value "//*[local-name()='ID']" in "Correlation From XPath Expression" setting -


Similarly, provide the values "POIDRes" & "//*[local-name()='ID']" in settings "Correlation To XPath Name" & "Correlation To XPath Expression" respectively of PurchaseOrderResponseDocDef -


Now add the documents to the Remote TP "MarketInc" configuration. Go to "Partners --> MarketInc --> Documents" and click on the green plus (+) button on the right side to select the document definitions. Add both document defintions PurchaseOrderRequestDocDef & PurchaseOrderResponseDocDef into "MarketInc" configuration and select the "Sender" & "Receiver" checkboxes appropriately -


Now create a channel under channels tab for MarketInc TP-


Now create a channel under "Host TP (OracleServices)-->Channels" tab. This channel will move all the inbound documents to a FILE location (Make sure that this channel is marked as "internal" under "Channel Attributes") -


Now create the agreements for both the document definitions between OracleServices & MarketInc. Save, validate & deploy the agreements as well -


Create two listening channels under "Administration --> Listening Channel" tab – one "internal" listening channel for sending outbound documents to Oracle B2B and another external (non-internal) listening channel for receiving inbound documents from Remote TP's -


Now you are ready to test this configuration. I used below request and response XML's for testing -


<?xml version="1.0" encoding="UTF-8"?>
<po:PurchaseOrderRequest xsi:schemaLocation="http://xmlns.oracle.com/ns/order po.xsd" xmlns:xsi="http://www.w3.org/2001/XMLSchema-instance" xmlns:po="http://xmlns.oracle.com/ns/order">
<po:CustID>111-11-1111</po:CustID>
<po:ID>PO123456</po:ID>
<po:productName>Laptop</po:productName>
<po:itemType>String</po:itemType>
<po:price>150.00</po:price>
<po:quantity>2</po:quantity>
<po:status>Order</po:status>
<po:ccType>New</po:ccType>
<po:ccNumber>1234-1234-1234-1234</po:ccNumber>
</po:PurchaseOrderRequest>


<?xml version="1.0" encoding="UTF-8"?>
<po:PurchaseOrderResponse xsi:schemaLocation="http://xmlns.oracle.com/ns/order po.xsd" xmlns:xsi="http://www.w3.org/2001/XMLSchema-instance" xmlns:po="http://xmlns.oracle.com/ns/order">
<po:ID>PO123456</po:ID>
<po:status>Approved</po:status>
</po:PurchaseOrderResponse>


Save request XML with name "MarketInc_PurchaseOrderRequest_1.0_1_123456788.xml" (format is ToTPName_DocType_DocTypeRevision_MsgType_MsgId.xml) & response XML with name "MarketInc_123455789.xml" (format is FromTPName_MsgId.xml).

Now copy & paste the request XML in internal listening channel directory. Make sure that after few seconds it gets deleted from there and a file gets created in the Remote TP Channel directory. Once the outbound flow is completed (a file gets created in Remote TP Channel's directory), copy & paste the response XML in external listening channel directory. Make sure that after few seconds it gets deleted from there and a file gets created in the Host TP Channel directory.

Now goto to "Reports" section on B2B console and in "Business Message" reports, open the details of response message. You will see that "Refer To Message" field is enabled and if you click on it, it will take you to the request message details. Moreover, if you scroll down on details, you would be able to see correlation related information as well -


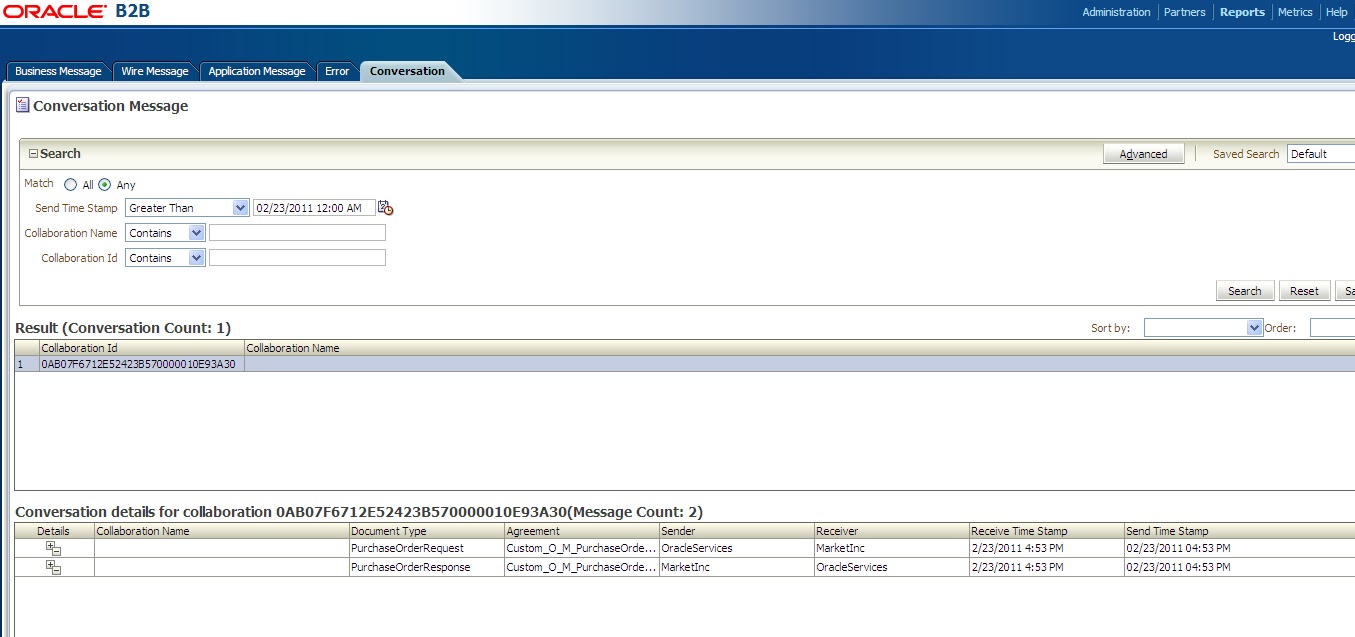
If you open the "Conversation Message" report then there also you would see a collaboration created. If you select that collaboration, it would show you both the request and response business messages, listed under section "Conversation Details" -


You are done with implementing correlation in Oracle B2B 11g. Now go ahaed and experiment more with it.

Wednesday, February 16, 2011

B2B Console/SOA Composer Not Opening Up in Oracle SOA 11gR1 PS3 (11.1.1.4.0)


If you have just installed Oracle SOA Suite 11gR1 PS3 (11.1.1.4.0) and created a domain by selecting “Developers” templates (Oracle SOA Suite for developers – 11.1.1.0 [Oracle_SOA1]) then you might not be able to open B2B web-console or SOA composer console. When you try to open B2B console (or SOA composer) in browser it will show “Error--404 Not Found” -


Actually this is not an issue and that's how developers template is designed. Developers template has been introduced in PS3(11.1.1.4.0) for those developers who run SOA suite on a host which have lower memory capabilities. So to optimize the server memory usage, certain applications does not get targetted and (hence) deployed (including “b2bui”) by default when a server starts. The applications which does not get deployed by default, are -


1. FMW Welcome Page Application (11.1.0.0.0)
2. SocketAdapter
3. MQSeriesAdapter
4. OracleAppsAdapter
5. usermessagingdriver-xmpp
6. usermessagingdriver-smpp
7. usermessagingdriver-voicexml
8. usermessagingdriver-extension
9. b2bui
10. composer


If you login to Weblogic Admin console and go to “Deployments” section (In Domain Structure at left hand side), you will find that all above applications are in “Installed” state - 


These applications are in “Installed” state because they do not get targetted to any server by default. If you want to use these applications, then you have to manually target these applications to appropriate server, once after creating the domain. As in “Developers” template, only a single admin server gets created for hosting SOA (BPM & OSB, if chosen) applications and a BAM managed server gets created to host BAM applications, hence all SOA (BPM & OSB) related resources must be targetted to “AdminServer


Let's see how this targetting should be done. I will show you how to do it for “B2BUI” application which is a Web-App, you may do this similarly for other applications as well, as and when required.

Login to Weblogic Admin console and go to “Deployments” section (In “Domain Structure” at left hand side) -
 

Click Customize this table at the top of the Deployments table.


Change the number of rows per page to 100

Select the checkbox to exclude libraries and click Apply

Above steps are required for your convenience so that you may see all relevant deployments in one page. Above steps will need to be performed once only after creating the domain.


Now, click on the “b2bui” application name on the same page -


Go to “Targets” tab, select all components and click on “Change Targets” -


Select “AdminServer” in “Target Deployments” screen and click on “Yes” -


Make sure that “Current Target”section, now shows “AdminServer” for all components and you see the success message on Weblogic Admin Console -


Now, try to open B2B web-console in a web-browser and it should get opened -


Enjoy B2B 11gR1 PS3 now!! :)


You may similarly target “composer” application to AdminServer to open up SOA composer console(http://host:port/soa/composer).

Friday, January 14, 2011

Dynamic Validate Action in Oracle Service Bus

Till current release of OSB (11.1.1.3), there is no support for dynamically specifying XML Schema/WSDL and Elements/Types for schema validation using "Validate" action of OSB. You have to select XSD/WSDL and Element/Type at design time itself.

This has been raised as an ER (Enhancement Request) to Oracle, and it is expected that future release of OSB will have this Dynamic Validation kind facility.

For the time being users can rely on Java (XMLBeans & OSB java API) to implement this solution. Using java callout for validation will slightly hurt you on performance. After measuring, I found that on an average it takes almost thrice time as compare to OSB validate action if you use java but still it is the best choice in the case when you have hundreds of schemas/WSDL's to choose

Another option may be to use IF-ELSE statements in the message flow and select WSDL's/XSD's at design time itself and at runtime whichever condition gets fulfilled, that Validate action will execute. This alternative is best for the cases when you have very limited number of WSDL's/XSD's

Hope to see the Dynamic Validate action enhancement soon!! :)

Tuesday, October 26, 2010

Enabling SSL on Oracle B2B 11g

In this post I will discuss that how do we enable SSL on Oracle B2B 11g and how do we configure keystore (known as “Wallet” in 10g era) for message security (signing & encryption)


First of all you need digital certificates for enabling security. You may use self-signed certificates for development purpose but it is recommended to use a certificate signed by a trusted certificate-issuing authority (CA) like Verisign, Thwate etc. for higher environments (Test, Pre-prod and Prod)


Step #1 – Generating certificates and Preparing Keystore

As I mentioned earlier that you may use both self-signed and third party issued certificates so I will show you that how to create both.

In Oracle Fusion Middleware 11g stack, we use keytool utility for certificate management. Keytool utility gets shipped with JDK installation itself.

So let us start with certificates generation-

a) Create a directory to store all the certificates and keystore in it. I create one directory D:\b2bkeystores

b) Open a command prompt and execute $MW_HOME/user_projects/domains//bin/setDomainEnv.cmd to set the environment (setting proper JDK in PATH will also do but it is recommended to execute above command to make sure that you are using right JDK and you are generating certificates on the server machine itself)

c) Run below command to create a new keystore and generate a new self-signed key-pair (public and private key) in it –

keytool -genkeypair -alias serverCert -keyalg RSA -keysize 1024 -validity 365 –dname "CN=localhost.myCompany.com,OU=Support,O=myCompany,L=Gandhinagar,ST=Gujrat,C=IN" -keypass welcome1 -keystore keystore.jks -storepass welcome1

where localhost.myCompany.com (HostName.Domain) is name of certificate holder, “Support” is organizational unit, “myCompany” is name of the organization , “Gandhinagar” is city/locality, “Gujrat” is State/Province, “IN” is the two-letter country code for this unit

Above command will create a keystore with name “keystore.jks” and it will add a self-signed key-pair in the keystore. You may directly use this self-signed certificate or may get it signed by a third party CA.

Note that the PEM (Privacy Enhanced Mail) format is the preferred format for private keys, digital certificates, and trusted certificate authorities (CAs) and the preferred keystore format is the JKS (Java KeyStore) format in Weblogic server.

Remember that when you use the Keytool utility, the default key pair generation algorithm is Digital Signature Algorithm (DSA) but WebLogic Server does not support DSA so specify another key pair generation and signature algorithm when using WebLogic Server. Here we are using RSA (which stands for Rivest, Shamir and Adleman who first publicly described it) algorithm.

To view the content of the keystore anytime, you may run below command –

keytool -list -keystore keystore.jks -storepass welcome1

If you run above command just after generating the certificates, then below would be shown –


Keystore type: JKS


Keystore provider: SUN


Your keystore contains 1 entry


servercert, Oct 25, 2010, PrivateKeyEntry,


Certificate fingerprint (MD5): CE:38:E1:29:56:72:5F:26:DB:92:27:16:FD:74:5B:DE


If you want to use self-signed certificate (do not want to get your cert signed by any CA) then skip the steps d,e and f


d) Now run below command to generate a CSR (Certificate Signing Request) –

keytool -certreq -v -alias serverCert -file serverCert.csr -keypass welcome1 -storepass welcome1 -keystore keystore.jks

You should see below lines on prompt –

Certification request stored in file


Submit this to your CA


This command will generate a CSR with name “serverCert.csr”. You have to pass this CSR to the third party CA to get it signed by them. The content of the CSR looks like below –

-----BEGIN NEW CERTIFICATE REQUEST-----


MIIBvDCCASUCAQAwfDELMAkGA1UEBhMCSU4xDzANBgNVBAgTBkd1anJhdDEUMBIGA1UEBxMLR2Fu


ZGhpbmFnYXIxEjAQBgNVBAoTCW15Q29tcGFueTEQMA4GA1UECxMHU3VwcG9ydDEgMB4GA1UEAxMX


bG9jYWxob3N0Lm15Q29tcGFueS5jb20wgZ8wDQYJKoZIhvcNAQEBBQADgY0AMIGJAoGBAKSt9gLC


TcRU5DynNuAO1Clp/3ygzH1Vdqf4RlQg7p9B5xuNX8ZqhpaN5Ua7pmp9LcLDLUFu3Kzqv6oD7Wa+


nUWvaHKK6Xmz6lclOiapR029FheTx+iZ06qAoi1P/OYu8PVOO+Ldzalz5+dJE9fC51ofRcSJ9xFx


mYsqH9oznUFxAgMBAAGgADANBgkqhkiG9w0BAQUFAAOBgQB560z7cUiaNLI4mN6IqtqfgVsLgp29


86rV+5Xi3PqGgJaVTqpKotR5gMRUMMcvDETdhsY6feTnYkUHlGYXNdLjkGEkIG2qHXiWzZDjxXym


tDIDlToa3FzWEYAyGWshJaoHXzXbicvY3abHcK8ZgADAZgJXjMF8xKMOJ1ua5aI8fw==


-----END NEW CERTIFICATE REQUEST-----


Make sure to take a backup of keystore because once it gets lost/damaged, then you will not be able to recover it and remember that CSR can be imported back into the same keystore (or in it’s backup copy) only after getting signed.


e) Once you get the signed certificate back from third party CA, you have to import it into your keystore along with the certificate of CA who signed your certificate.

Convert the CA certificates and signed certificate received from CA, into PEM format and store them in the same directory where our keystore is (D:\b2bkeystores). As there may be a chain of CA certs so store each and every certificate of the chain, separately.

Now run below command to import the top certificate in the chain (Root CA cert – this must be a self-signed certificate of the CA) –

keytool -importcert -v -noprompt -trustcacerts -alias rootCA -file rootCA.pem -keystore keystore.jks -storepass welcome1

where “rootCA” is the alias of this certificate and “rootCA.pem” is the file which contains the Root CA certificate.

You should see below line if certificate gets added to keystore successfully –

Certificate was added to keystore

Now repeat this step for each and every CA certificate in the certificate chain with different and meaningful alias each time.

For Verisign issued certificates, there may be two CA certs in the chain – Root CA Certificate & Intermediate CA Certificate. So you have to execute above command once for Root CA and after that once for Intermediate CA

f) If you are done with importing the CA certificates then now import the signed reply certificate by using below command –

keytool -importcert -v -alias serverCert -file serverCert.pem -keystore keystore.jks -keypass welcome1 -storepass welcome1

where “serverCert” is the alias of the certificate we generated, “serverCert.pem” is the signed certificate sent by the CA (in PEM format)

If it gets imported successfully then you would see below line –

Certificate reply was installed in keystore

Make sure that you use same alias as what you used while generating certificate and generating CSR (step C and D)

Now if you will run the list command then it will show you all the CA certs you imported as “trustedCertEntry” and the certificate you generated (and got it signed) as a “keyEntry” -

keytool -list -keystore keystore.jks -storepass welcome1


Keystore type: jks


Keystore provider: SUN

Your keystore contains 3 entries


verisignintermediate, Oct 18, 2010, trustedCertEntry,


Certificate fingerprint (MD5): BA:B0:65:B4:3B:9C:E8:40:30:21:7D:C5:C6:CD:3F:EB


serverCert, Oct 18, 2010, keyEntry,


Certificate fingerprint (MD5): 89:C3:19:1D:17:43:76:0A:C3:2E:FB:1F:1F:35:74:D1


verisignroot, Oct 18, 2010, trustedCertEntry,


Certificate fingerprint (MD5): CB:17:E4:31:67:3E:E2:09:FE:45:57:93:F3:0A:FA:1C


g) Run below command to export the public certificate of your server from the kesytore -

keytool -exportcert -alias serverCert -file serverCert.cer -keystore keystore.jks -storepass welcome1


You should see below line on prompt -

Certificate stored in file

Above command will create a file with name “serverCert.cer” which is actually the public certificate of your server which you may share with your Trading Partners.

h) Now import the certificate of all your Remote Trading Partners along with their CA certificates, in the keystore we created. First of all store your TP’s certificate and their respective CA’s certificate in separate files in PEM format (as we did in step ‘e’). After that import all the Root CA certificates (if any) with different alias and then import all the intermediate CA certificates (if any) with different alias and after that import the certificates of all your TP’s with different alias, in the keystore we created.

To add first root CA cert in the keystore, you may use below command –

keytool -importcert -v -noprompt -trustcacerts -alias VerisignRootCA -file VerisignRootCA.pem -keystore keystore.jks -storepass welcome1

where “VerisignRootCA.pem” is a file which holds the VerisignRootCA certificate in PEM format

You should see below lines on prompt –

Certificate was added to keystore


[Storing keystore.jks]

Repeat this process and re-run the above mentioned importcert command for all the certificates.


Step #2 – Configuring Keystore on SOA Server


Now we have to configure the keystore we created on, SOA server. Open the Oracle Weblogic Admin console (by default http://localhost:7001/console) and login into it.

Go to Environment --> Servers and click on the SOA server name (by default soa_server1). Select the checkbox against “SSL Listen Port Enabled” and provide the value for “SSL Listen Port” (by default 8002). Now click on “Save” to save the changes.


Now go to “keystore” sub-tab of “Configuration” tab and click on “Change” button against setting “Keystores”  and select the “Custom Identity and Custom Trust” from the “Keystores” dropdown –


Click on “Save” and it will ask you to provide keystore location (absolute path and filename), type and password for both Trust and Identity. Provide the information of kesytore we created in both the sections (Identity & Trust) –


Click on “Save” to save the configuration. Now go to SSL sub-tab, provide the private key alias and password and save the configuration –


Now you are done with the configuration on SOA server. Now to check whether keystore and SSL configuration is behaving properly open Oracle B2B console over HTTPS in any browser (by default https://localhost:8002/b2b where 8002 is SSL listen port of SOA server). If it opens properly, then it means that configuration is working and you may also see the certificate it is presenting on Microsoft Internet Explorer (IE7/IE8)


You may see a warning related to certificate on IE if your certificate has not been signed by a trusted third party CA and you have not installed it yet on windows. You may safely ignore this warning.


Another test case is to access the Oracle B2B default HTTP delivery channel over HTTPS (https://localhost:8002/b2b/httpreceiver) in any web-browser. If it is accessible over HTTPS then on web-browser you should see below text –

B2B Server

B2B Server is ready to accept HTTP messages from the Trading Partner


Step #3 – Configuring Keystore on Oracle B2B Console


Now we have to configure the keystore for Host Trading Partner on Oracle B2B console (by default http://localhost:8001/b2b or http://localhost:8001/b2bconsole)

First of all open the b2b console and login into it. Now navigate to “Profile” tab of Host Trading Partner. Scroll downward and you would see “Key Store” configuration section there. Provide the location of keystore (absolute path with name) and it’s password –


Click on “Save” button to save the configuration –


You are done with the configuration and guess what, you may now use message security and transport security with Oracle B2B 11g!!!

Wednesday, October 20, 2010

Installing Oracle B2B Document Editor 11g (11.1.1.1.0)

Oracle B2B Document Editor is an integral part of the Oracle B2B product. You may use Oracle B2B Document Editor to create and to implement guidelines for Oracle B2B custom document definitions.

In this post I will discuss that how to install Oracle B2B Document Editor. First of all you have to download Oracle B2B Document Editor (11.1.1.1.0) from here. Oracle B2B Document Editor runs on Microsoft Windows only so you will find installable for windows version only on the download link.


There are three zip files (total size is almost 4GB) which you need to download –

ofm_b2b_doc_editor_win_11.1.1.1.0_disk1_1of3.zip

ofm_b2b_doc_editor_win_11.1.1.1.0_disk1_2of3.zip

ofm_b2b_doc_editor_win_11.1.1.1.0_disk1_3of3.zip


Now right click on first zip file (ofm_b2b_doc_editor_win_11.1.1.1.0_disk1_1of3.zip) and extract it into a local directory. I extracted its content in D:\OracleB2BDocEditor


Similarly extract the content of other two zip files in the SAME (D:\OracleB2BDocEditor) directory. Now you should see below structure under directory D:\OracleB2BDocEditor –


Inside directory “D:\OracleB2BDocEditor\Multisetup”, you should be able to find below files –


Inside directory “D:\OracleB2BDocEditor\Oracle B2B”, you should be able to find below files –

 Inside directory “D:\OracleB2BDocEditor\Standards”, you should find below structure –


If above all is correct then run the “Install.exe” (D:\OracleB2BDocEditor\Install.exe). It would open up the Oracle B2B document editor installation wizard –


Select “Oracle B2B” and click on “Next”. It will take you to the screen where it will show all the operations which will be performed –


Click on “Next” and installshield wizard for Oracle B2B will get opened –


I changed the installation directory because on Vista you may face access issues if you install it in Program Files directory.


Once done with selection, click on “Install” and it should install Oracle B2B Document Editor in your machine.


Now Standards Installation will start automatically –


You may install the standards locally or a network drive (for sharing purpose). I installed them locally.


Now I will change the installation directory to a subdirectory of Document Editor Installation directory (it is an optional configuration. You may keep the default location value) –


Once done with selection, click on “Install” to install the standard.


Now you have to repeat above standard installation steps for each and every standard. Installation prompt will keep opening up one by one and you have to repeat the steps.

It may take almost 25 minutes to get all the standards installed. Once all the standards will get installed, you will be prompted with the result –


Make sure that “Result” is “Ok” for all operations. You are finish with the installation process now.


You may run “D:\OFMW11g\OracleDocEditor\SpecBuilder.exe” to start the Oracle B2B Document Editor.